Showing posts with label MySQL. Show all posts

Wednesday, 22 January 2014

Useful MySQL Database Commands


Create a database on the sql server.

mysql> create database [databasename];

List all databases on the sql server.

mysql> show databases;

Switch to a database.

mysql> use [db name];

To see all the tables in the db.

mysql> show tables;

To see database's field formats.

mysql> describe [table name];

To delete a db.

mysql> drop database [database name];

To delete a table.

mysql> drop table [table name];

Show all data in a table.

mysql> SELECT * FROM [table name];

Returns the columns and column information pertaining to the designated table.

mysql> show columns from [table name];

Show certain selected rows with the value "whatever".

mysql> SELECT * FROM [table name] WHERE [field name] = "whatever";

Show all records containing the name "Bob" AND the phone number '3444444'.

mysql> SELECT * FROM [table name] WHERE name = "Bob" AND phone_number = '3444444';

Show all records not containing the name "Bob" AND the phone number '3444444' order by the phone_number field.

mysql> SELECT * FROM [table name] WHERE name != "Bob" AND phone_number = '3444444' order by phone_number;

Show all records starting with the letters 'bob' AND the phone number '3444444'.

mysql> SELECT * FROM [table name] WHERE name like "Bob%" AND phone_number = '3444444';

Show all records starting with the letters 'bob' AND the phone number '3444444' limit to records 1 through 5.

mysql> SELECT * FROM [table name] WHERE name like "Bob%" AND phone_number = '3444444' limit 1,5;

Use a regular expression to find records. Use "REGEXP BINARY" to force case-sensitivity. This finds any record beginning with a.

mysql> SELECT * FROM [table name] WHERE rec RLIKE "^a";

Show unique records.

mysql> SELECT DISTINCT [column name] FROM [table name];

Show selected records sorted in an ascending (asc) or descending (desc).

mysql> SELECT [col1],[col2] FROM [table name] ORDER BY [col2] DESC;

Return number of rows.

mysql> SELECT COUNT(*) FROM [table name];

Sum column.

mysql> SELECT SUM(*) FROM [table name];

Join tables on common columns.

mysql> select lookup.illustrationid, lookup.personid,person.birthday from lookup left join person on lookup.personid=person.personid=statement to join birthday in person table with primary illustration id;

Create a new user. Login as root. Switch to the MySQL db. Make the user. Update privs.

# mysql -u root -p mysql> use mysql; mysql> INSERT INTO user (Host,User,Password) VALUES('%','username',PASSWORD('password')); mysql> flush privileges;

Change user’s password from unix shell.

# [mysql dir]/bin/mysqladmin -u username -h hostname.blah.org -p password 'new-password'

Change user’s password from MySQL prompt. Login as root. Set the password. Update privs.

# mysql -u root -p mysql> SET PASSWORD FOR 'user'@'hostname' = PASSWORD('passwordhere'); mysql> flush privileges;

Recover a MySQL root password. Stop the MySQL server process. Start again with no grant tables. Login to MySQL as root. Set new password. Exit MySQL and restart MySQL server.

# /etc/init.d/mysql stop # mysqld_safe --skip-grant-tables & # mysql -u root mysql> use mysql; mysql> update user set password=PASSWORD("newrootpassword") where User='root'; mysql> flush privileges; mysql> quit # /etc/init.d/mysql stop # /etc/init.d/mysql start

Delete a column.

mysql> alter table [table name] drop column [column name];

Add a new column to db.

mysql> alter table [table name] add column [new column name] varchar (20);

Change column name.

mysql> alter table [table name] change [old column name] [new column name] varchar (50);

Make a unique column so you get no dupes.

mysql> alter table [table name] add unique ([column name]);

Make a column bigger.

mysql> alter table [table name] modify [column name] VARCHAR(3);

Delete unique from table.

mysql> alter table [table name] drop index [colmn name];

Load a CSV file into a table.

mysql> LOAD DATA INFILE '/tmp/filename.csv' replace INTO TABLE [table name] FIELDS TERMINATED BY ',' LINES TERMINATED BY '\n' (field1,field2,field3);

Dump all databases for backup. Backup file is sql commands to recreate all db's.

# [mysql dir]/bin/mysqldump -u root -ppassword --opt >/tmp/alldatabases.sql

Dump one database for backup.

# [mysql dir]/bin/mysqldump -u username -ppassword --databases databasename >/tmp/databasename.sql

Dump a table from a database.

# [mysql dir]/bin/mysqldump -c -u username -ppassword databasename tablename > /tmp/databasename.tablename.sql

Restore database (or database table) from backup.

# [mysql dir]/bin/mysql -u username -ppassword databasename < /tmp/databasename.sql

Create Table Example 1.

mysql> CREATE TABLE [table name] (firstname VARCHAR(20), middleinitial VARCHAR(3), lastname VARCHAR(35),suffix VARCHAR(3),officeid VARCHAR(10),userid VARCHAR(15),username VARCHAR(8),email VARCHAR(35),phone VARCHAR(25), groups VARCHAR(15),datestamp DATE,timestamp time,pgpemail VARCHAR(255));

Create Table Example 2.

mysql> create table [table name] (personid int(50) not null auto_increment primary key,firstname varchar(35),middlename varchar(50),lastnamevarchar(50) default 'bato');

Friday, 17 January 2014

How To Get Database Size in MySQL

Database Size Calculation

Using following steps you can calculate the size of the existing MySQL database:
  • 1. Open Terminal/Command prompt(Window)

    In window, Goto start-->Search cmd-->Click to open
  • 2. Change to MySQL directory


  • 3. Connect to MySQL Database

    mysql -h localhost -p -u alfresco
    Enter Password:

  • 4. Type select command to get size of a Database

    select table_schema, sum(data_length+index_length) 
    /1024 /1024 as MB from informaation_schema.tables 
    where table_schema ="datbase_name";

Thursday, 16 January 2014

Change Alfresco Database Connection (Alfresco 3.3 or higher)

New updated version of the Alfresco comes with PostgreSQL. If you are still using Database other than PostgreSQL, you can change the Database following given steps:
  1. Create a new "alfresco" database (Here i am assuming your current database is "alfresco")
  2. Create a new 'alfresco' user. Set this user's password to 'alfresco'. (Here i am assuming your current user name and password are "alfresco")
  3. Ensure that the alfresco user has the required privileges to create and modify tables.
  4. Verify/modify the Alfresco data location in the alfresco-global.properties file.
  5. Override some properties in alfresco-global.properties 
  6. Start the application server (eg. Tomcat) to verify your configuration changes. 
If you are using MySQL you can follow these step:
  1. Create a new "alfresco" database,here.
    CREATE DATABASE <DATABASENAME>;
  2.  Create a new 'alfresco' user. Set this user's password to 'alfresco'.
    GRANT ALL PRIVILEGES ON alfresco.* To  
    'alfresco'@'localhost' IDENTIFIED BY 'alfresco';
  3. Ensure that the alfresco user has the required privileges to create and modify tables 
  4. Verify/modify the Alfresco data location in the alfresco-global.properties file. 
  5. Override some properties in alfresco-global.properties
    db.name=alfresco
    db.username=alfresco
    db.password=alfresco
    db.host=localhost
    db.port=3306
    db.driver=org.gjt.mm.mysql.Driver
    db.url=jdbc:mysql://${db.host}:${db.port}/${db.name}
    db.pool.validate.query=select 1
    To recover all index back. You have to override these properties.
    db.schema.update=true
    index.recovery.mode=FULL
    db.schema.update.lockRetryCount=24
    db.schema.update.lockRetryWaitSeconds=5
  6. Start the application server (eg. Tomcat) to verify your configuration changes.  

PostgreSQL example 

The following properties needs to change:  
alfresco-global.properties:
db.name=alfresco
db.username=alfresco
db.password=alfresco
db.host=localhost
db.port=5432
db.driver=org.postgresql.Driver
db.url=jdbc:postgresql://${db.host}:${db.port}/${db.name}
Ensure that the postgresql.conf file (pg_hba.conf for postgres 8.1.3) (refer to PostgreSQL documentation for more info on this file) contains:
host    all    all    127.0.0.1/32    password

Oracle example 

The following properties needs to change:  
alfresco-global.properties:
db.name=alfresco
db.username=alfresco
db.password=alfresco
db.host=localhost
db.port=1521
db.driver=oracle.jdbc.OracleDriver
db.url=jdbc:oracle:thin:@${db.host}:${db.port}:<database sid>
db.pool.validate.query=select 1 from dual 

Microsoft SQL Server example

The following properties needs to change:  
alfresco-global.properties:
db.name=alfresco
db.username=alfresco
db.password=alfresco
db.host=localhost
db.port=1433
db.driver=net.sourceforge.jtds.jdbc.Driver
db.url=jdbc:jtds:sqlserver://${db.host}:${db.port}/${db.name}
db.txn.isolation=4096
db.pool.validate.query=select 1

DB2 example

The following properties needs to change:  
alfresco-global.properties:
db.name=alfresco
db.username=alfresco
db.password=alfresco
db.host=localhost
db.port=50000
db.driver=com.ibm.db2.jcc.DB2Driver
db.url=jdbc:db2://${db.host}:${db.port}/${db.name}

Tips:

For Mor Informaton: Database_Configuration

Source : http://wiki.alfresco.com/wiki/Database_Configuration

Wednesday, 15 January 2014

How to Create a Database in MySQL

MySQL can be an intimidating program. All of the commands have to be entered through a command prompt; there is no visual interface. Because of this, having basic knowledge of how to create and manipulate a database can save you a lot of time and headaches. Follow this guide to create a database of US states and their populations

Creating and Manipulating a Database

    1. Create the database.  From the MySQL command line, enter the command CREATE DATABASE <DATABASENAME>;. Replace <DATABASENAME> with the name of your database. It cannot include spaces.
    For example, to create a database of all the US states, you might enter CREATE DATABASE us_states;
    Note: Commands do not have to be entered in upper-case.
    Note: All MySQL commands must end with ";". If you forgot to include the semicolon, you can enter just ";" on the next line to process the previous command.
    1. Display a list of your available databases. Enter the command SHOW DATABASES; to list all of the databases you have stored. Besides the databse you just created, you will also see a mysql database and a test database. You can ignore these for now.   

    1. Select your database. Once the database has been created, you will need to select it in order to begin editing it. Enter the command USE us_states;. You will see the message Database changed, letting you know that your active database is now us_states.

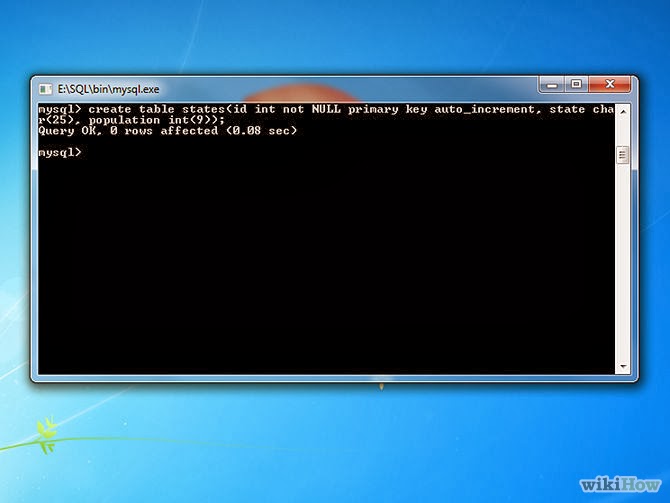
    1. Create a table. A table is what houses your database’s information. To create one, you will need to enter all of your table formatting in the initial command. To create a table, enter the following command: CREATE TABLE states (id INT NOT NULL PRIMARY KEY AUTO_INCREMENT, state CHAR(25), population INT(9));. This will create a table named "states" with three fields: id, state, and population.
    • The INT command will make the id field contain only numbers (integers).
    • The NOT NULL command makes sure that the id field cannot be left blank.
    • The PRIMARY KEY designates the id field as the key field in the table. The key field should be set to a field that cannot contain any duplicates.
    • The AUTO_INCREMENT command will automatically assign increasing values into the id field, essentially automatically numbering each entry.
    • The CHAR(characters) and INT(integers) commands designate the types of data allowed in those fields. The number next to the commands indicated how many characters or integers can fit in the field.

    1. Create an entry in the table. Now that the table has been created, it’s time to start entering your information. Use the following command to input your first entry: INSERT INTO states (id, state, population) VALUES (NULL, ‘Alabama’, ‘4822023’);
    • This is essentially telling the database to enter the information provided into the three corresponding fields in the table.
    • Since the id field contains the command NOT NULL, entering NULL as the value will force it to automatically increment to 1, thanks to the AUTO_INCREMENT command.

    1. Create more entries. You can create multiple entries using a single command. To enter the next three states, use the following command:INSERT INTO states (id, state, population) VALUES (NULL, ‘Alaska’, ‘731449’), (NULL, ‘Arizona’, ‘6553255’), (NULL, ‘Arkansas’, ‘2949131’);. This will create a table that looks like the following:

source: wikihow

Friday, 6 December 2013

How to run multiple instances of MySQL on Windows using command line


We all know how to run mysql using either MySQL work bench or command prompt. 
Just a single click and our mysql server is ready to use. But there is lot of moment. We have to run multiple applications on single windows server. 
It is due to some constrains like costing and management efforts. 
Same time we need to separate our Database servers for some privacy concern.

Here I will show you can run multiples instances using command line or window services.
There are two way to run multiple instances of MySQL
1.  Using windows command line
2.  Using windows service

Here in this document i will explain how to run multiple instances using command line

Using windows command line:
Before proceeding further first learn how MySQL work 

Like every application, it is also works on config file. Here config file is "my.ini". it’s file which mysql use for configuration. You can find it somewhere in location "mysql_home". In this default config file, basiclly some properties are defined like datadir( where mysql will store data), port(which port mysql will use for connection) , size of cluster etc. You can pass all these parameters while running it using command line i will explain it later.

Starting MySQL from the Windows Command Line :
As I said MySQL server can be started manually from the command line. This can be done on any version of Windows.

To start the mysqld server from the command line, you should start a console window (or “DOS window”) and enter this command:
shell> "C:\Program Files\MySQL\MySQL Server 5.0\bin\mysqld"

The path to mysqld may vary depending on the install location of MySQL on your system.

You can stop the MySQL server by executing this command.

shell> "C:\Program Files\MySQL\MySQL Server 5.0\bin\mysqladmin" -u root shutdown

Note:-
By default mysql user is root and its password is the password of the root user. 
You can pass all this using -u username , -p password respectively.

As I said, by default mysql server loads “my.ini” config file from root dir of mysql. 
You can put your configuration in separate file and pass it using command line.

Code would be something like this.
C:\> C:\mysql\bin\mysqld --defaults-file=C:\my-opts1.cnf

This is how you will run multiple instance. You have to install mysql server in two separate locations.

Let’s assume my two mysql locations are
C:\> C:\mysql1\

C:\> C:\mysql2\

Now you have to create two separate config file

mysetting1.ini

[mysqld]
datadir = C:/mydata1
port = 3307


mysetting2.ini

[mysqld]
datadir = C:/mydata2
port = 3308

Here I have chosen different port, to differentiate servers in application layer. 
Use the --defaults-file option to start each server with its own option file

C:\> C:\mysql\bin\mysqld --defaults-file=C:\mydettings1.cnf
C:\> C:\mysql\bin\mysqld-debug --defaults-file=C:\mysetting2.cnf

Each server starts in the foreground (no new prompt appears until the server exits later), so you will need to issue those two commands in separate console windows.

To shut down the servers, connect to each using the appropriate port number:

C:\> C:\mysql\bin\mysqladmin --port=3307 shutdown
C:\> C:\mysql\bin\mysqladmin --port=3308 shutdown

There is lots of parameter that you can pass using command line. Those are --shared-memory-base-name,

--shared-memory. You can explore it more. You can also create simple .bat file which will run these command on single click.
Sources: